I’ve been trying to find ways to make better use of my raspberry pi zero and i think i have found one! We are going to build an Raspberry Pi Zero USB Dongle and shared internet with your pc! and install services like webmin, owncloud, and vnc makes for a very compelling pc in your pocket!
you can download and 3d print your own usb dongle shell
Equipment List
Raspberry Pi Zero – Amazon | Ebay
3D printed Files – http://www.thingiverse.com/thing:1836302
male usb connector – Amazon | Ebay
4 wires
some soldering skills
Process
Step 1
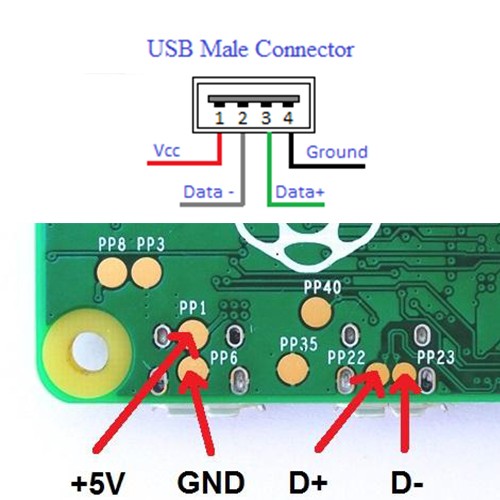
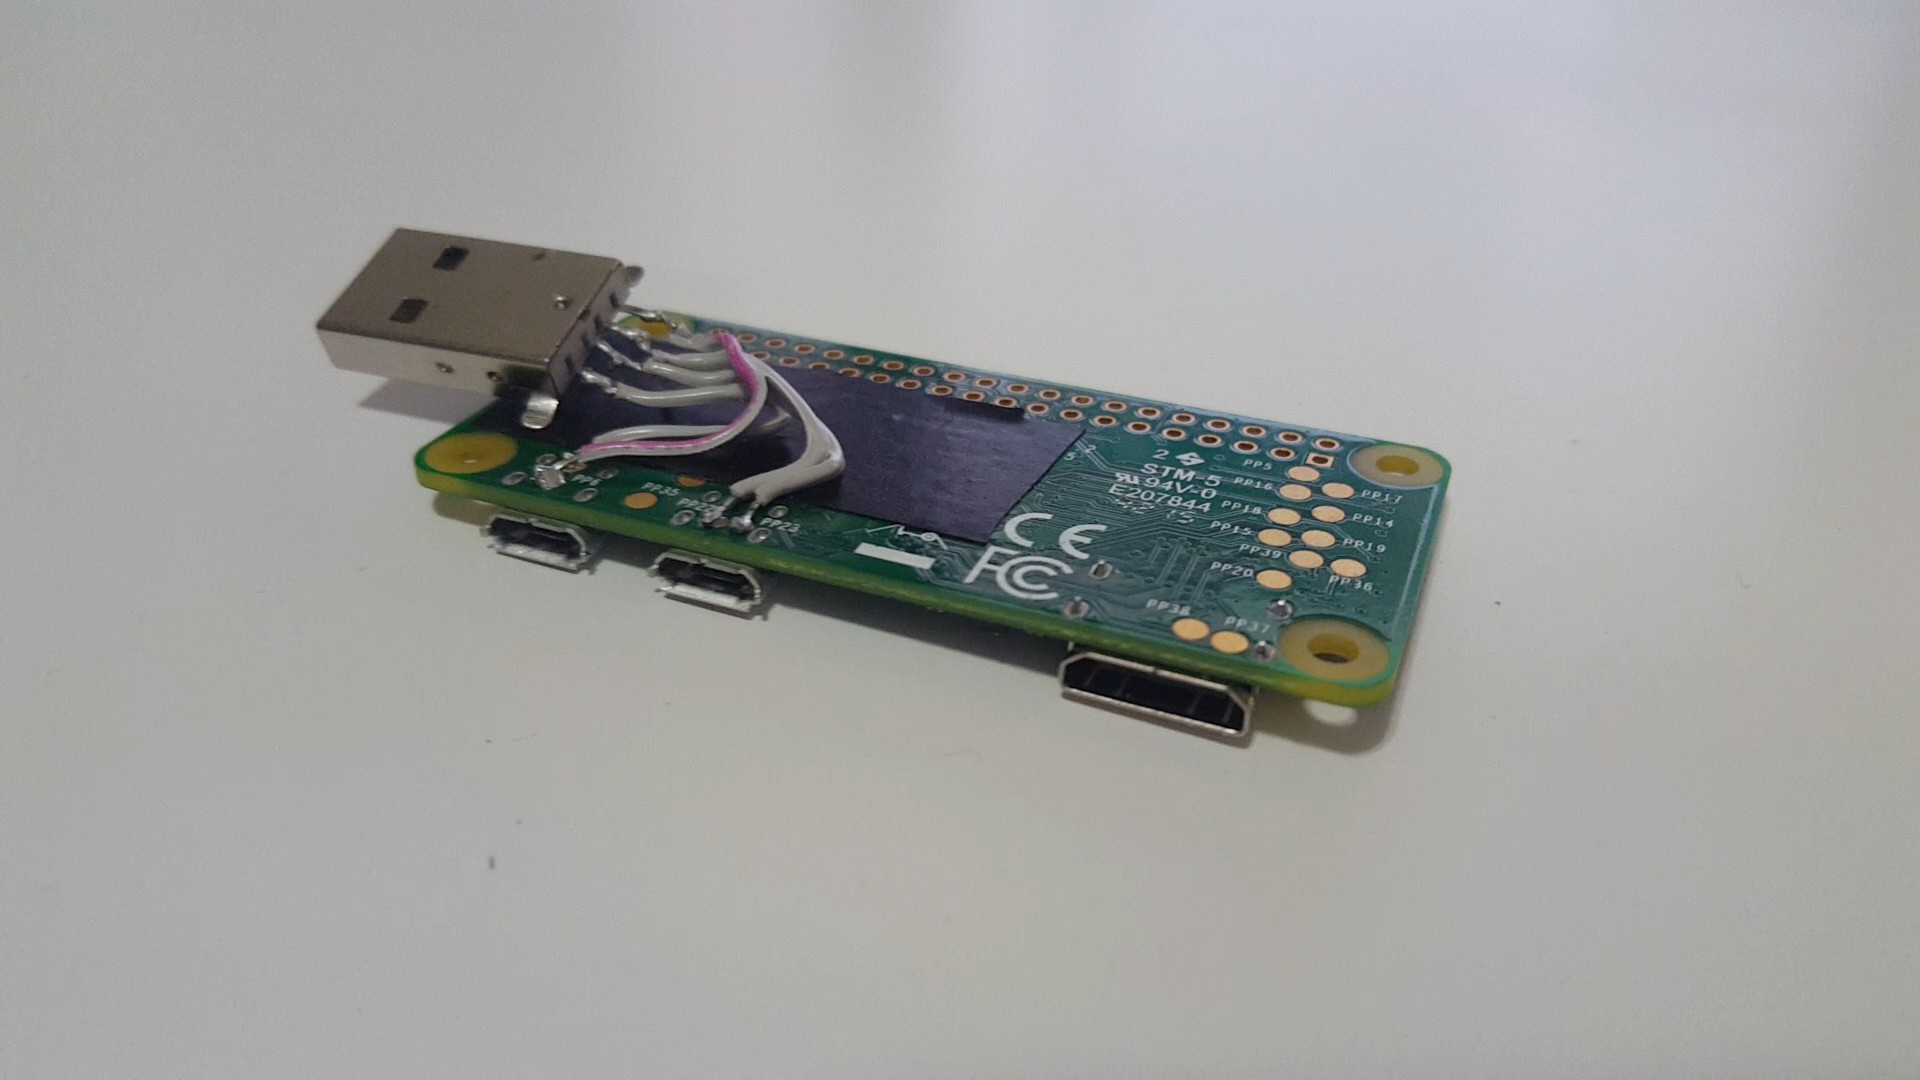
Firstly we need to install a USB male header to our Raspberry Pi Zero. here is the diagram you need to follow to solder the male USB to the raspberry pi zero
i would also add some electrical tape to protect the usb connector from grounding with the raspberry pi
Step 2
I’m using the latest Raspberry Pi Image called Pixel which you can download here
and load the the image to the sd card.
When you are done, located the file config.txt from the Boot drive of the sdcard and insert this at the end
dtoverlay=dwc2then save the file, and locate the file called cmdline.txt and insert this text right after rootwait
modules-load=dwc2,g_etherwhen done, save the file and you can now insert the sdcard into the raspberry pi zero
to access your raspberry pi from your computer, use ssh client and point it to
raspberrypi.local
now you should be all done!
updates: start page https://www.novaspirit.com/2016/10/30/raspberry-pi-zero-usb-startpage/
View Comments (34)
Great post by the way., but I'm using berryboot, and the cmdline.txt is not the same. There is no rootwait entry. By chance do you have a suggestion on where to make the change? There isn't much on documentation on berryboot, or I'm looking in the wrong place. This would be great to use for several applications for both Zero's and regular Pi's.
Another question, why go through the hassle of soldering on a USB in that fashion? Are you creating a crossover on the data lines? Perhaps that's why this isn't working for me also. I'm just using the USB port with regular USB cable to power up. Trying to not break out the iron if I don't have to, I'm on the road.
you should be able to apply the "modules-load" at the end if you do not have root wait, i solder the usb for convenience so i do not have to carry a cable with me every time i want to use the USB. but you will not be able to use the micro usb otg port the same time the pi 0 is connected to the computer.
Rey COLDHEAT solder iron, battery power,portable. great fo r on the go. tip hot ONLY whenever you're make contact at solder point.
Can the USB OTG connection of the pi zero be used as normal? I want to connect a USB microphone to my pi zero while it is also connected to my laptop.
I've seen this project here too:
http://n-o-d-e.net/post/150780207431/turn-the-raspberry-pi-zero-into-a-mini-dongle
While N_O_D_E includes links and instructions to windows and mac drivers for making the dongle connect to a non-linux computer, N_O_D_E didn't make a 3d print holder.
Awesome, finally can use my zero headless with out wifi; thanks.
Just note your diagramming shows a female usb, but is labeled male. And the wiring below in the usb to zero picture shows the ground as the red and white wire. This could be confusing for some maybe use the corresponding colors would be better.
Any word on using this with Win10? Seems to make it a comm port and not easy to make it NDIS
hey Tally, did you managed your windows 10 issue?
same problem here...
You will need to install Bonjour (https://support.apple.com/downloads/bonjour_for_windows) then it will detect the pi as an ethernet device.
I've followed all your directions exactly. when I boot the Pi 0 I get:
[ 4.539540] dwc2 20980000.usb: dwc2_hsotg_enqueue_setup: failed queue (-11)
when it boots. Any clues?
Did you find a way to get this working? I see the same "dwc2_hsotg_enqueue_setup: failed queue (-11)"
FOllowed directions and double checked that everything is as was described in the tutorial. However, the Pi Zero is not recognized when I plug it into my computer. My Windows 10 computer does not have a RNDIS driver (not listed in Microsoft Drivers) . Any idea how to find it?
As a follow up I tied this again with another PI zero and it worked perfectly. The difference between the PI zeros is that the one that worked was a 1st generation and the one that didn't was a 2nd generation. Any ideas why 1st generation would work but 2nd generation would not?
PS - with the latest version of Jessie you need to boot up the Pi Zero "normally" first (i.e., connected to a screen) so that you can enable SSH. Otherwise, when you try to connect using raspberrypi.local via SSH it will be refused. After booting up and enabling SSH, you can make the edits to config.txt and cmdline.txt described in the tutorial.
You will need to install Bonjour (https://support.apple.com/downloads/bonjour_for_windows) then it will detect the pi as an ethernet device.
did that and still nothing.. any more solutions ?
I've tried this with both the original zero and the version 1.3 zero and they both give me the error:
dwc2 20980000.usb: dwc2_hsotg_enqueue_setup: failed queue (-11)
on booting and the Putty application will not connect on the Win10, tried this with both the pixel and the lite but not working. Also as stated above you now need to enable ssh before your try to connect, not that it will do you any good if you get this error.
when you have the file system open in your pc/mac put an empty file in the root called ssh. reboot the pi and now it's enabled.
This did not work for me... I opened the boot on my mac/PC... where the config and cmdline text files are... then created that ssh.reboot file and still not working...
Hello.... Very Cool... Is it possible to also use the other micro usb slot by soldering on a usb female.
Thx